Ya, Migration was never so tedius, boaring and bugging job for me. It all depends on work you are doing. On the eve of Dipavali, I was all set to run for mumbai and never thought that simple migration will eat my time like anything.
It was a GT migration, as Nilesh was on leave it came on my head. Totally there were 7 workflows needs to be migrated. First time I saw that all workflows under particular folder are getting migrated. Though changes are in only 3 mappings not sure why do they migrate whole code :-(
Each workflow out of 7 has again 12 sessions each. Every sessions was of particular map, so 12 mapping for each session. Out of 12 mappings, 2 mappings were so big, that if you try to open those at Mapping Developer, it was getting hang. Those maps were having 15-16 pipelines each and number of tranformations. yes, that migration was really big.
Around 5 pm, started the migration, and had a plan pack the bags by 6 completing the migration and applying the label.
First Took export of all 7 workflows each and checked for verbose mode. Ya, that thing cs ppl do not like :-(. After getting clear on that, started importing one by one. As changes were not made by me, was very conscious while verifying each and every tranformations, especially targets and source. [THere is a separate nightmare of versioning, will describe it some other time]. For first successful import it took me 20 mins :). After that completed the second workflow which took another 20 mins. Clock's pointer were almost reaching 6, and this time Bikram asked me to call Nilesh again. As was already frustrated, without any hesitation I dialed Nilesh again. and asked him how much time the whole migration usually takes?
He first asked me, how you are doing the migration, one - by - one workflow? and obviouly the answer was Yes.
He started laughing, and said, first take the export by all 7 workflows simultaneously and import only one xml as mostly all trnaformations - source, targets, lookups, filters, expressiosn etc - are common.
* first lesson learned - if you are migrating such large number of workflows, took export of all at same time. As below
At Repository Manager
1. Select all workflows which needs to be migrated and go to repository menu and inside that click on export.

2. Save the wolething as a single xml, give anyname you want. e.g. 7_workFlow_Migration_26Oct.xml
3. Import that xml again, into project or qa folder.
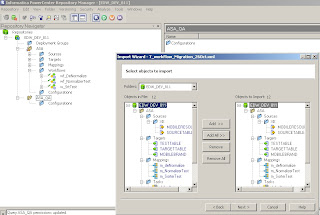
 As you click on import, another window will get popup. Depending upon your requirement, select objects which you want to migrate. In my case, I had selected all objects. and click on next.
Another widow will get appear which will ask you to select the folder - source to destination. Tool is such claver, that it will pick source folder information from xml which you have exported from - hats of to the informaitca coders. For first time, destination folder will be same as source folder name - tool is still not able to read what's in your mind, wait for some more years.
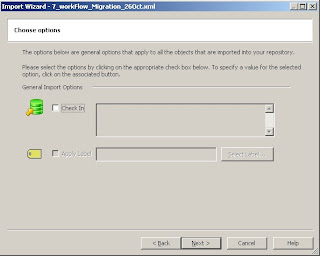
After choosing correct source and destination folders, go ahead by click next. A new Window will ask you whether you want to checkin your new objects in new folder? Now here, Its a belief - its a belief as I never tried it - that if we checkin hear, comments which we give will not appear for checked in objects. So, as per advice by our seniors, please skip this step and do not click on check in.
 To resolve the conflicts between objects, new window will appear which will ask you to create any rule if you want. I never came across any such need, so just skip this step and click next.

 When you go to next window, here its an important task for decision. You need to resolve the conflicts here either you have to reuse, replace or rename the objects in new folder where you are copying into. In my case, as new folder was totally empty, its showing conflicts only for session properties.
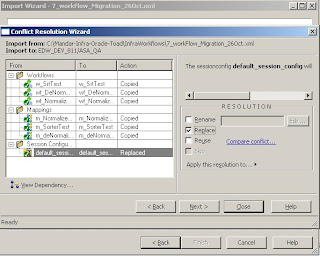 This is the last step which you will be follwing. and after it you just have to click on import button and all mappings, sessions, wokflow and tranformations inside it will get copied.


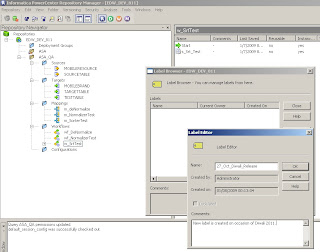 Just give appropriate label name and click on OK. imp: though at image label name is starting with number, it wont allow first character as number and it has to be alphabet. Now, you want to apply label to all workflows which you have migrated. Thought in a folder, there are only 7 workflows, you are not supposed to add label on whole folder level, reason is, there can be number of objects which are not dependant on 7 workflows, and those will get migrated un-necessarily.
 Once you click on apply label, new window will appear as below
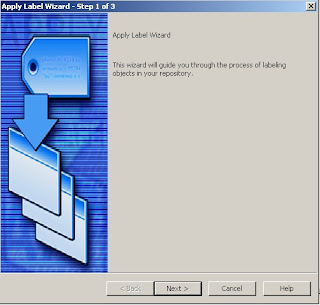 Click on Next, and window will appear where you want to select the objects for which you want to apply the label.
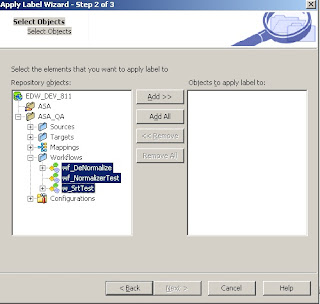 Click on Add, and again Next. New windlow will appear where you will actually select the label which you are going to apply.
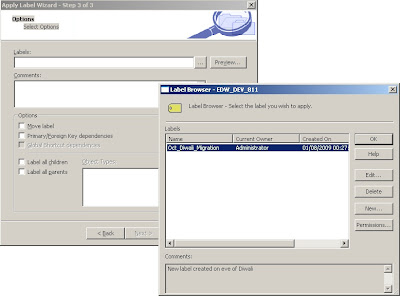 After selecting the required label, click on OK, give the meaningful comment, and do not forgot to check "Label All Chindren" and "Label All Parents". Click on finish and you are done with your job.


It was a GT migration, as Nilesh was on leave it came on my head. Totally there were 7 workflows needs to be migrated. First time I saw that all workflows under particular folder are getting migrated. Though changes are in only 3 mappings not sure why do they migrate whole code :-(
Each workflow out of 7 has again 12 sessions each. Every sessions was of particular map, so 12 mapping for each session. Out of 12 mappings, 2 mappings were so big, that if you try to open those at Mapping Developer, it was getting hang. Those maps were having 15-16 pipelines each and number of tranformations. yes, that migration was really big.
Around 5 pm, started the migration, and had a plan pack the bags by 6 completing the migration and applying the label.
First Took export of all 7 workflows each and checked for verbose mode. Ya, that thing cs ppl do not like :-(. After getting clear on that, started importing one by one. As changes were not made by me, was very conscious while verifying each and every tranformations, especially targets and source. [THere is a separate nightmare of versioning, will describe it some other time]. For first successful import it took me 20 mins :). After that completed the second workflow which took another 20 mins. Clock's pointer were almost reaching 6, and this time Bikram asked me to call Nilesh again. As was already frustrated, without any hesitation I dialed Nilesh again. and asked him how much time the whole migration usually takes?
He first asked me, how you are doing the migration, one - by - one workflow? and obviouly the answer was Yes.
He started laughing, and said, first take the export by all 7 workflows simultaneously and import only one xml as mostly all trnaformations - source, targets, lookups, filters, expressiosn etc - are common.
* first lesson learned - if you are migrating such large number of workflows, took export of all at same time. As below
At Repository Manager
1. Select all workflows which needs to be migrated and go to repository menu and inside that click on export.

2. Save the wolething as a single xml, give anyname you want. e.g. 7_workFlow_Migration_26Oct.xml
3. Import that xml again, into project or qa folder.

Another widow will get appear which will ask you to select the folder - source to destination. Tool is such claver, that it will pick source folder information from xml which you have exported from - hats of to the informaitca coders. For first time, destination folder will be same as source folder name - tool is still not able to read what's in your mind, wait for some more years.
After choosing correct source and destination folders, go ahead by click next. A new Window will ask you whether you want to checkin your new objects in new folder? Now here, Its a belief - its a belief as I never tried it - that if we checkin hear, comments which we give will not appear for checked in objects. So, as per advice by our seniors, please skip this step and do not click on check in.
 To resolve the conflicts between objects, new window will appear which will ask you to create any rule if you want. I never came across any such need, so just skip this step and click next.

 When you go to next window, here its an important task for decision. You need to resolve the conflicts here either you have to reuse, replace or rename the objects in new folder where you are copying into. In my case, as new folder was totally empty, its showing conflicts only for session properties.
 This is the last step which you will be follwing. and after it you just have to click on import button and all mappings, sessions, wokflow and tranformations inside it will get copied.
The story do not end here actually, after importing all objects, last task was to check-in all the objects with proper comment, so that we can identify what all objects we have imported.

If you observe, here ASA_QA folder is empty, even though we have imported the 3 workflows. Why? because those are not yet checked in. Now, once we check in those all objects, hopfully tool will work fine and will show the objects at QA folder.

give proper comment for objects you are checking in.

Once you checked in those, as per your expectations, tool do not work :). You need to re-connect to the repository and again need to open the QA folder. And now, you can view the things which you are expecting.
But, still my story do not end here, if you have observed, while importing, my all objects were in checked out status, but after importing and checkin in at QA, not a single object was impacted or invalid. Yes that thing you need to verify after you done with the import.
At the time of my migraion, means once I had imported all 7 workflows, one mapping was showing me as impacted. Initially I thought, because of my migration, map got impacted, so I went to map designer, checked it out, did the validation and again checked. I varified the comment just to verify if its been migrated from my user folder, and found the comment was missing. I checked for dependancing now and I could see number of dependant tranformations. "How will you check the dependancy --> just right click on map [or any object for that matter] and click on ' view dependancies..'.
Now I lost my temper, and cursying myself like anything, what went wrong I was not sure. I checked all objects [totally 130+] one by one, noted those which do not have comment which I gave while importing. Searched those missing comments objects at old user folder and found, those objects were not present. Eureka !! Got a clque, might be those sessions and mappings are not connected with those 7 workflows wich I had migrated. So, this time while checking the dependancing, I just click on workflow

Fortune favors the brave, and there were no results :). I had did my job correctly. Only thing I missed is, before importing the objects, I forgot to check if any object is checked-out, impacted or invalid in project or QA folder. Be sure you will verify that...
Now only thing, which was remaining was applying the label.
LABEL -- though not important for developers, but very crucial for ppl who are doing actual migration. Because from Stg --> QA --> Prod migration happens without humam intervation, automatically by tools like pvcs, or pada depending on company.
Go to versioning menu --> inside that Labels ..
After clicking on Label, new window will appear which will ask you to give lavel name which you want to create.
 Just give appropriate label name and click on OK. imp: though at image label name is starting with number, it wont allow first character as number and it has to be alphabet. Now, you want to apply label to all workflows which you have migrated. Thought in a folder, there are only 7 workflows, you are not supposed to add label on whole folder level, reason is, there can be number of objects which are not dependant on 7 workflows, and those will get migrated un-necessarily.
How will you apply label :- Select folder name which contains your workflows, go to Versioning -->Apply Label
 Once you click on apply label, new window will appear as below
 Click on Next, and window will appear where you want to select the objects for which you want to apply the label.
Here, do not select whole folder, but all required workflows.
 Click on Add, and again Next. New windlow will appear where you will actually select the label which you are going to apply.
 After selecting the required label, click on OK, give the meaningful comment, and do not forgot to check "Label All Chindren" and "Label All Parents". Click on finish and you are done with your job.
Just to verify, for how many objects label has been applied, you can create a query at informatica level.
Query :-- Go to tool at menubar and inside that click on queries..A new window will appear which will ask you to create new query as below

Give query name you want, select parameter - here I have selected as label, give the respective criteria.

And shoot on blue arrow. You will get to see all objects which which this label got applied.

Just verify how many objects you were actually migrated, and for how many objects the label got assigned. Note - label will get assigned only for latest checked in version of an object.
Before I end up - below are the things to always check at the time of migration
1. First verify at ur project/qa or developer folder any object is impacted, checkedout or invalid. If its so, first resolve that and then start for migration.
2. In case of large migration, do not do it one by one, rather take export of all worklows in single go and import all things in single go.
3. Do not checkin object while you are importing it, as comment will not appear in such cases if you do so.
4. After you imported all workflows/objects, please checkin those objects first.
5. Just re-verify if any of the object is impacted, checked out or invalid at project or qa folder.
6. Again write a query on the basis of comment, and count actual number of objects you were migrated and actualy numbr of objects for which comment has been assigned.
7. Once you confirm all above things, apply label only to those objects which you have actually migrated, be careful at this step.
8. Again write a query on basis of applied label and count number of objects again.
Hope this will help you..good luck